Flow-aide System Descaler Kit & Service Valve Kit | Eccotemp
Introducing The Flow-Aide System Descaler Kit And 3/4inch Service Valve Kit
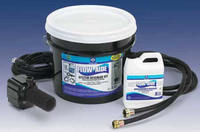
Cleaning your tankless water heater is now easier than ever before, with the new Flow-Aide System Descaler Kit. Using this descaler kit along with our 3/4 Inch Tankless Water Heater Service Valve Kit, there is no longer any need to disconnect your plumbing from your water heater when descaling is needed, saving you time and inconvenience.Our 3/4 Inch Service Valve Kit allow for easy regular maitenance, as well as easy diagnostic testing.
The Flow-Aide System Descaler Kit includes: One 3.5 gallon bucket, one 500 GPH pump, two 5 foot rubber hoses, and one quart of flow-aide cleaning solution.
Our Eccotemp 3/4 inch Tankless Water Heater Service Valve Kit includes: Set of 2 heavy duty forged brass ball valves, a full port main flow channel, large drain port outlets, color-coded aluminum handles, and uniquely designed lever/wing handle.
Please continue below on how to install your 3/4 Inch Tankless Water Heater Service Valve Kit:
1. Wrap the ends of the threaded water inlet & outlet on the tankless water heater, as well as the threaded end of the approved pressure relief valve (enclosed) with a minimum of 5 wraps of PTFE thread tape or another approved thread sealant.
2. Screw the pressure relief valve into the 3/4" threads opposite the wing handle on the HOT water service valve. (RED drain handle) (see Pressure Relief Valve Section for proper installation requirements)
3. Loosen the 3/4" union nut on the HOT water valve and connect to the HOT water outlet on the tankless water heater. If nut is removed, ensure that you realign the tailpiece accurately to the valve and that the black washer is
positioned such that the raised metal edge of the valve is inside the washer.
4. Align the direction of the HOT water drain to the desired position.
5. Tighten the union assembly to the HOT water valve using approximately 15 foot lbs of torque.
6. Repeat steps 3-5 for the COLD water valve. (BLUE drain handle) for connection to the COLD water inlet on the tankless water heater.
7. Connect the INLET on the COLD water valve to the MAIN SOURCE of the water supply.
8. Connect the OUTLET on the HOT water valve to the HOT WATER plumbing system.
9. Ensure that both drain valve lever handles are in the closed position (perpendicular to the drain portion of the body).
***For proper care of this approved pressure relief valve, it is recommended that the valve is manually operated once a year. In doing so, it will be necessary to take precautions with regard to the discharge of potentially scalding hot water under pressure. Ensure discharge has a place to fl ow. Contact with your body or other property may cause damage or harm.***
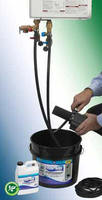
Please see below on how to descale your tankless water heater, using the 3/4 Inch Tankless Water Heater Service Valve Kit:
1. Disconnect power to water heater.
2. Close hot and cold isolation and service valves and remove service caps.
3. Pour 1.25 gallons of water into bucket and place under water heater.
4. Add contents of 1 quart bottle of Whitlam Flow-Aide into bucket (Bucket should be filled approximately 1/2 full).
The higher the concentration the faster the system will be cleaned. Minimum dilutions is 1 part water to 1 part Flow-Aide. Be sure to have enough solution to keep the pump submersed when in use.
5. Connect one hose to pump, and other end of same hose to cold service valve. Place pump in bucket.
6. Connect second hose to hot service valve. Place other end in bucket.
7. Open both hot and cold service valves.
8. Plug pump into grounded receptacle.
9. Allow pump to circulate Whitlam Flow-Aide solution through heater for 30-45 minutes. Unplug pump.
10. Close cold service valve. Remove hose from cold service valve, and replace service cap.
11. Disconnect the hose from the pump and remove pump from bucket. Discard Whitlam Flow-Aide solution.
12. Flush tankless water heater for 3-5 minutes or until water flows clear by opening the cold isolation valve and allowing water to exit through the hot service valve into a drain or bucket. If using a bucket, empty periodically.
13. Close hot service valve. Remove hose from service valve and replace service cap.
14. Open hot isolation valve.
15. Connect power to water heater and return appliance to service.
 Weekly Deals
 Water Heaters
 Accessories
 Installation
 Parts
Parts
 Protection Plans
 Final Sale


